25th August 2007
With approval from my gardening wife
that the garden railway should go ahead I have made a start. The total overall
estimated length is 70m which at a scale of 1:20 give a scale length of a
little less than a mile. |
 |
 |
| Above is a set of 6 piece of Peco
Track that make a 180 degree turn. Radius of the centre line is 600mm |
I was loaned a long truck with two
bogies and they fitted the track with ease. So I can now make a start on
surveying the ground. |
 |
This is a garden before anything is
started.
The red pipe across the centre of the
picture is a water level. I was able to determine that the ground end to
end of the garden is within tolerance for slope. I have set a max gradient
of 1:25 - most of the ground does not exceed 1:40. |
 |
A rather grotty end of the garden
where nothing seems to grow well so the railway line may well enhance
it.
The permission was for the line to follow
the edge of the lawned area and be supported on decking. NO concrete No gravel
clippings. |
 |
This runs from the initial piece
which is right at the top of the picture. |
 |
This is to the left of the original
piece. |
 |
I have set the minimum curve radius to
600mm - which is the smallest standard track from Peco. This will upset some
Garden Railway friends as their large loco will not go round the corners.
As I shall be scratch building most of my locos ALL will goes round the bends
- and any way this is being built for the benefit of the
grandchildren!!!!
The setting out stick is marked with
the width of the decking and its centre point and then 600mm 700mm 800mm
900mm 1000mm, 1100mm in radius that I get some idea as the how tight the
curve will be.
Click for more
information on the curve and angles of the jointed pieces. |
 |
Here is where the hard work is done
cutting up the decking. I was offered the loan of a CHOP SAW but as I was
also told not to make the joint in the timber tight the hand saw has proved
to be just great.
|
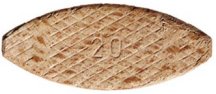
A biscuit |
Each section of decking, whether
curved or straight, when cut had a recess cut into it for a biscuit joint.
The biscuit joint ensures that the surface of adjacent pieces of decking
remain in line with to each other. Then decking screws are driven in on the
inside and outside of the curve to secure both pieces together and sometimes
also through the decking surface into a base piece for additional stability.
By doing this even if the decking is hit by a lawn mower the track remains
undamaged.
A Biscuit joiner is a woodworking
tool used to join two pieces of wood together. It uses a small circular blade
to cut a suitably shaped hole in each of the adjacent ends of the decking.
An oval shaped wooden biscuit is covered with glue, placed in the slot, and
the two decking boards are brought together. A biscuit joiner is simple and
quick to use. You can create joints in a fraction of the time it takes using
more traditional woodworking techniques. |
26th August
The photos which follow show the progress
in the day.
The construction of the bridge and slope
down to grass level from behind the shed was a great construction project
and reminded me of my days as a training Chartered Surveyor setting out curves
on a playing field. |
 |
 |
 |
 |
 |
27th August
All the track base that was currently
laid was linked up and ready for a coat of preservative especially for the
exposed ends.
I have decided to lay the base on wide
plastic DPC, to give some protection to the timber base from the damp ground
beneath!!! |
28th August
The remaining sections of track base
were laid leaving just a short section to link up. |
 |
 |
The final joint is made and track
laying can commence. |
 |
 |
| The track, is Peco G-45 Code 250
rail, which I started laying behind the shed with a 600mm radius curve and
then proceeded with a 4m straight run to the bridge. The track sections are
joined by Peco conductive rail joiners code SL-910 which can be purchased
in packets of 18 units. |
The slope down is 1:40. I shall be
trying out the track tonight in darkness . Well what time is best !!!! |
| The test of the track went
very well but did show that the loco needed a little more weight to stop
the drive wheels slipping - or the slopes need to be reduced !!!! |
29th August
An afternoon start !!!! |
 |
 |
The above photo shown the track from
the section after the bridge we arrive at this relatively level section. |
From there into this tight bend |
 |
From the tight bend it straightens
up before the hair pin bend.
This was to position at 18:00 but I did
lay 5m more after supper but it was too dark for photos.
The little loco did some more test runs
and all seems well. Where the ground is slightly undulating there will be
soil etc packed under the track - after the underlay DPC barrier has been
put in place. |
30th August
Morning start |
 |
Working on from yesterday the picture
above shows the track stopped at the paving slab which is pictured bottom
left hand side of this picture. |
 |
The complex 600mm radius corner which
whilst it limits the track's use to locos with a small wheel base make an
interesting turn !!!!
At the point to the left of the picture
I have run out of track but hope more arrives in stock tomorrow !!!! |
| 31st August late
afternoon start
More track arrived and b y 18:42hrs the
last piece of the track was laid and the loco put on the track for a test
run. This was completed successfully and now the final tidy up has to take
place and attention given to the section behind the shed. Leaves on the line
will be a big problem so some sort of brushing loco truck will be need soon!!!
|
| 2nd September
Live Steam Edrig loco arrives at the
track and has a very good run . |
 |
| 5th September
The Home Planning Authority (my wife
the keen gardener) has approved development of the railway. One corner of
the garden has always been grotty which I called "Grotty Corner" but my wife
has asked that it is developed as a "Fairy Grotto" |
 |
| The start of the installation of
a level crossing |
 |
| A second area for development where
a passing loop will be built "Jungle Junction" with station, church and possibly
other items !!!! |
 |
| September
11th
After a weekend without any attention
to the track I decided to make a start on "JUNGLE JUNCTION". The turn round
in the corner will just allow a 600mm radius - the minimum I am allowing
for the track. I hope that I will be able to pre bend the flexible track
before laying else the stress trapped will be great !!!!
The area is very tight to work in so
it has to be done in short bursts! |
 |
The turnout into Jungle junction |
 |
The return Turnout from Jungle junction
- BEFORE excavation |
 |
The return Turnout from Jungle junction
- AFTER excavation |
 |
Lawn mower step over !!! |
 |
A simple stop go light signal was
found on the web when a search was done for Model Railway Signal.
It uses a 555 timer chip and two reed
switches.
When the loco with magnet under it passes
over the first reed switch the light changes to red as the loco is already
passing through the signal then and little further on down the line another
reed switch triggers the led to change back to green.
The circuit could also include a relay
to isolate a part of the track so that two electric locos could not run into
each other !!!!
Ok so I have the Green at the bottom
and Red at the top ... Well it is only a first effort ! |
 |
The start of the construction of
a non scale "Look a like" Bailey Bridge. My
father in WWII built several of these bridges whilst in the Royal Engineers.
Sadly neither he nor my mother will see the bridge I am building but it is
a fitting memorial to both of them. However a test piece let out in the rain
resulted in all the timber joints falling apart .... so an alternative is
planned for 2008 ..I hope !!! |
| September
13th
Finally more decking arrived this afternoon
and I could continue with the JUNGLE JUNCTION corner. |
 |
The first piece of decking cut was
to support the point. They are an expensive item and need looking after
!!!! |
 |
The tight 600mm radius curve similar
to all the other tight curves was created in the decking using the 600 template
that I had used previously. I cut 5 sections - 6 section make a full 180
degrees but I noted that the corner took in an bend the other way and thus
found that a longer straight piece of decking could accommodate both turns
!!!
You can see the track disappearing behind
the pile of soil which gives you some idea of the amount of soil / stones
/ bricks I had to dig out with a small fork on hands and knees. Still my
wife approves and has plans for the shrubbery in the area.
|
 |
Here is a shot of the complete corner
- now I have to tidy up the tools ...
When I am running my live steam loco
I will prepare it on the main track and make what ever else is running go
on to the passing branch line !!! |
 |
Here you can see where the branch
line rejoins the main track.
My wife has agreed that this is an area
where I can develop the scenic part of garden railway on my ceramics.
There are plans for a station and a church
.... I am to chat to my local vicar and seek agreement to make a "look a
like" church to the local one. |
| So that completes all the
planned track laying until at least after Christmas 2007 when we have track
to use in side and it may then by used outside with two more points and agreement
with my wife as to where it can go !!! Some ask why does my wife have a say
in the track. Well for 21 years she and she alone has tended the garden making
it what it is today. My efforts with the railway have only taken 20 days.
|
| The story
continues here |
|